A deep dive into iOS CPU Architectures and Build Settings
It is more than a decade since the first iPhone was introduced. For new developers with no preconception of how CPU architectures historically evolved on Apple platforms, it may look cumbersome, official documentation about this topic might namely be incomplete or obscure. The various types of architectures, as well as their different behaviors, can be quite overwhelming. Even for seasoned iOS developers, it can be difficult to figure out how to bring everything together.
We will explore the different types of iOS CPU architectures and explain how you should reason about them, then will explain the differences between XCFrameworks and Universal frameworks. And finally, it will provide a list of the Xcode build settings related to the CPU architectures.
Brief history
By the time of writing these words, all iOS devices released so far are powered by processors based on ARM architecture, which comes in many different versions each has its own instructions set. On the other hand, when developing using iOS Simulator, this will inherit its architecture from the macOS CPU architecture if you're on an M1 mac it is different from Intel macs. So here are the major ARM architectures supported by iOS and iPadOS
-
armv6, armv7, armv7s: A 32-bit architecture that appeared on early iPhone and iPad devices. Supported up to iPhone 5 the march of time made them obsolete.
-
arm64: A 64-bit architecture used in iPhone 5s - iPhone 7 devices.
-
arm64e: The new dominant 64-bit iOS architecture used in Phone 8 - later devices.
For simulator:
-
i386: For simulators running on 32-bit Intel macs nowadays this is irrelevant.
-
x86_64: Used in 64-bit Intel macs simulator.
-
arm64: Used in Apple Silicon macs simulator.
Fat Binaries / Frameworks
For a binary to be compatible with various devices (different architectures) it has to be compiled for them specifically If you want to ship a pre-built framework that supports both iOS and iOS Simulator, one way to do that is to ship two separate frameworks. The iOS framework should contain all the architectures you support on iOS (typically 64-bit Arm) and the iOS Simulator framework should contain all the architectures you support on the iOS Simulator (typically 64-bit Intel, 64-bit Arm). Your clients will then have to link with the correct framework based on their build target. This is hard to maintain and counterintuitive process.
There is a better way to solve this issue by combining the generated binaries into a bigger binary. This is what is so-called "Universal Binaries", or "Fat Binaries", that can include executable code for more than one platform using the lipo tool.
- Build a Framework for the iOS SDK, targeting iOS architectures.
- Build a Framework for the iOS Simulator SDK, targeting macOS architectures.
- Use lipo to combine the two frameworks into a single framework for distribution.
A typical Universal Binary Framework would look like this:
UniversalFramework/
├── arm64-slice
└── x86_64-slice
While this approach works really well during development it comes with some pitfalls when submitting the app to the Appstore, like it unnecessarily increases the app binary size by including the simulator slice(es) also it may lead to app rejection when you try to upload the app with dependencies containing x86_64 slice to the AppStore you may face the famous error.
Please note that most dependency managers like CocoaPods and Carthage automatically strip the simulator slice before submitting to the Appstore.
Apple introduced a new way to simultaneously support devices and Simulator with the new XCFramework bundle type let's see how it works.
XCFrameworks
This Universal Binaries approach mentioned earlier comes with another limitation, it only supports one slice per architecture in other words we can’t support the same architecture on multiple platforms in a single Universal Framework.
Back in November 2020, Apple released its brand new macs powered by Apple Silicon processors that use arm64 architecture, as mentioned earlier all modern iPhones are powered by arm64.
Because of this limitation in lipo approach, we can't add support for the arm64-simulator thus the following configuration is not possible:
UniversalFramework/
├── ios-arm64-slice
├── ios-simulator-arm64-slice
├── ios-simulator-x86_64-slice
└── macos-arm64-slice
For this reason, the following weird error started to appear in recent Xcode releases.
Building for iOS Simulator, but the linked and embedded framework
'MyFramework.framework'  was built for iOS + iOS Simulator.
Because The binary framework contains different code for the same architecture in multiple places, and Xcode doesn’t know how to handle it.
This is where XCFrameworks come into play. This is a new container format with a particular structure. Whereas Universal Frameworks contain many slices without knowledge of the platform SDK for each one, XCFrameworks contain many slices organized by platform. Because of this platform-awareness, an XCFramework can target more than one platform for the same architecture, which solves our problem.
If we inspect the Framework.xcframework contents we’ll see that we have separate frameworks inside grouped by platform rather than architecture, as promised.
Framework.xcframework/
├── ios-arm64_armv7-slice
├── ios-x86_64-maccatlyst-slice
├── ios-arm64_x86_64-simulator-slice
└── macos-arm64_x86_64-slice
Compilation Directives
When writing code for a specific platform or processor type, we can isolate that code using the appropriate conditional compilation statements.
#if arch(arm64)
   //  arm64 architecture code here.
#elseif arch(x86_64)
   //  x86_64 architecture code here.
#endif
This really comes in handy when using Swift Package Manager it happens that sometimes you want to include a library only if the architecture is arm64 we can simply achieve this by wrapping that specific dependency inside
a compilation directive block.
#if arch(arm64)
let architectureSpecificPackageDependencies: [Package.Dependency] = [Apple Silicon Dependencis]
#else
let architectureSpecificPackageDependencies: [Package.Dependency] = [Intel Package dependencies]
#endif
let package = Package(
    ...
    dependencies: [...] + architectureSpecificPackageDependencies,
    ...
Build Settings
Xcode dedicates a complete section to customize the binary architectures settings, prior to Xcode 12 and M1 macs these build settings were straightforward and you barely touch them.
But things changed after the introduction of Apple Silicon macs and Xcode12, here is a list of the most relative build settings.
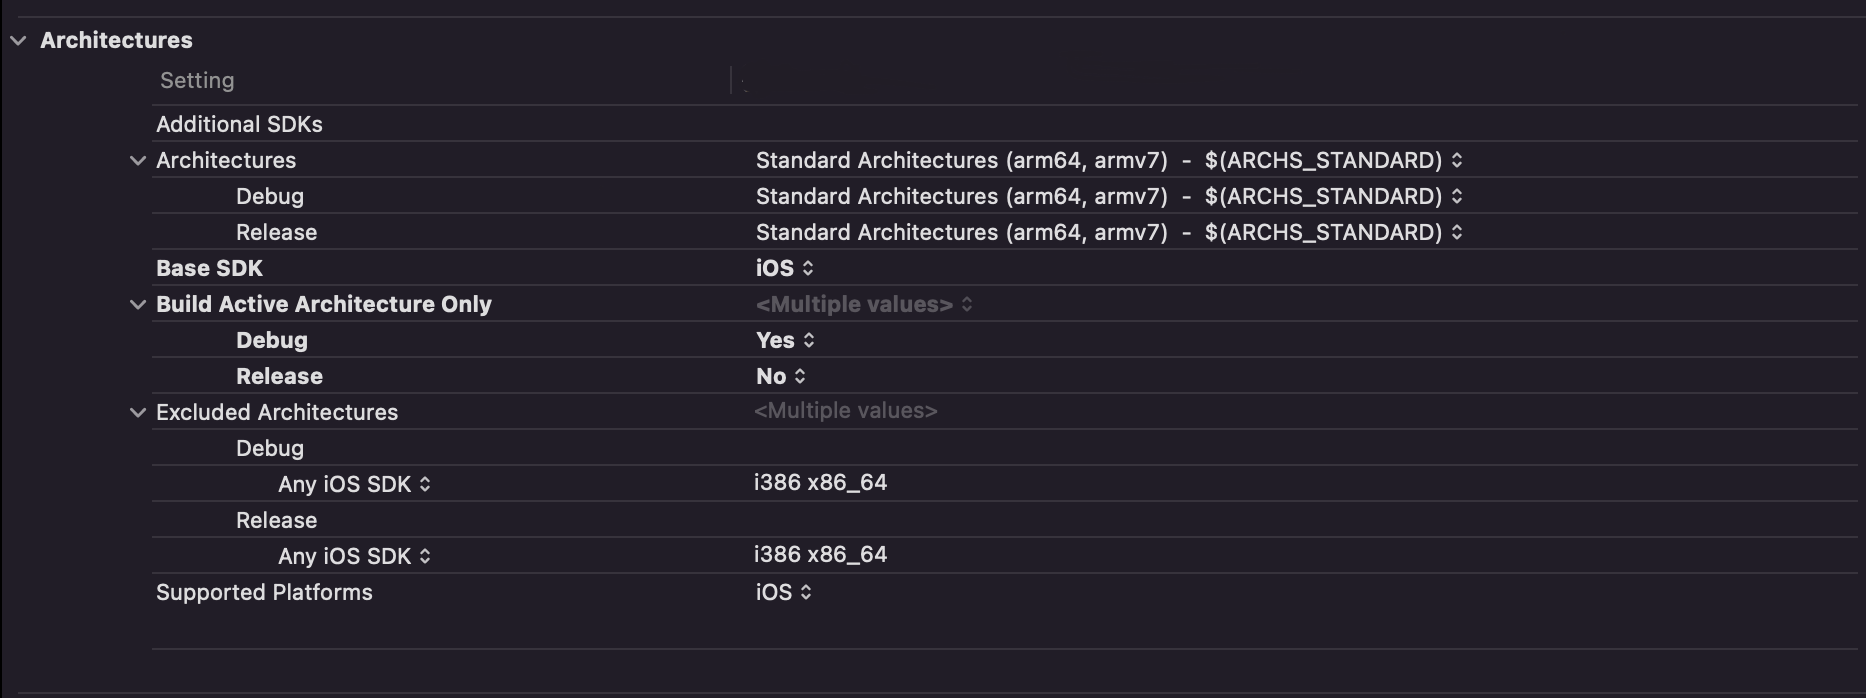
Architectures (ARCHS)
A list of the architectures for which the product will be built. This is usually set to a predefined build setting provided by the platform. If more than one architecture is specified, a universal binary will be produced. usually, it is set to $(ARCHS_STANDARD) which will be resolved to armv7 arm64 for device builds or x86_64 arm64 for simulator builds.
To see the architectures that Xcode will link against when building/archiving the app we can use the following commands
# list the supported architectures for the simulator
xcodebuild -showBuildSettings -scheme MyApp -sdk iphonesimulator | grep ARCHS
# list the supported architectures for the real device.
xcodebuild -showBuildSettings -scheme MyApp -sdk iphoneos | grep ARCHS
Build Active Architecture Only (ONLY_ACTIVE_ARCH)
One of the issues that arose with the introduction of M1 macs is linking against the iOS simulator, in the Xcode 12+ build system considers arm64 as a valid architecture for the simulator to support Apple silicon. So when a simulator is chosen as the run destination, it can potentially try to compile/link your libs/apps against arm64-based simulators, as well. That will eventually fail on an Intel-based Mac with the following error.
could not find module 'Framework' for target 'arm64-apple-ios-simulator'; found: x86_64-apple-ios-simulator, x86_64
The solution for this could be easy just by setting "Build Active Architecture Only (ONLY_ACTIVE_ARCH)" build setting to YES for debug mode.
This setting will be ignored when building with a run destination that does not define a specific architecture, such as a ‘Generic Device’ run destination
Excluded Architectures (EXCLUDED_ARCHS)
Like the name implies it excludes a set of architecture not to be compiled against. If you want to tell the compiler to ignore say i386 and arm64 simulator architectures on Intel macs you can simply do that by following
EXCLUDED_ARCHS[sdk=iphonesimulator*] = arm64 i386
Conclusion
This article gave a glimpse of how the CPU architecture evolved on the iOS platform and explained the essential rules to properly configure your project to support multi architectures.
The above technique is super useful when shipping frameworks, either internal ones or ones you share as open-source, you should start using XCFramework as soon as possible, even if you’re only supporting iOS! This will give the flexibility to add support for new platforms easily if necessary.
Thank you for reading! If you have any questions, or feedback you can find me on Twitter @alihilal94.